Rafter Layout with Log Timbers
Stepping Off
EXAMPLE:
The rafter in this example will be for a structure with a 3 foot RISE over a 4 foot RUN.
|
RISE per foot of RUN =
|
RISE in feet X 12
RUN in feet
|
OR
3 X 12
4
|
=
|
36
4
|
=
|
9 inches of RISE per foot of RUN
|
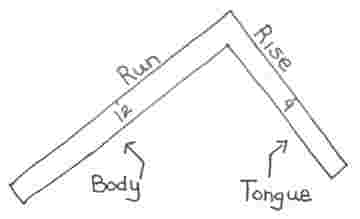
Drawing #14 below shows that we will be using 12 on the body of the square, representing one foot of RUN, and 9 on the tongue, representing 9 inches of RISE per foot of RUN
Drawing #14
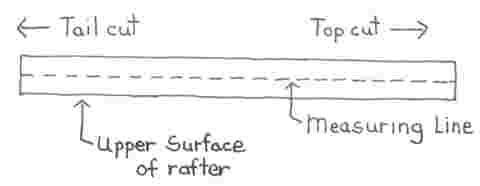
Drawing #15 shows your rafter material as it will appear in front of you with the measuring line already established. Remember that the top cut will be to your right, the tail cut to your left, and the upper surface of the rafter is the edge closest to you. If you are using logs the wide end is to your left.
Drawing #15
MARKING THE TOP CUT LINE
With the measuring line established, you can begin to step off your rafter.
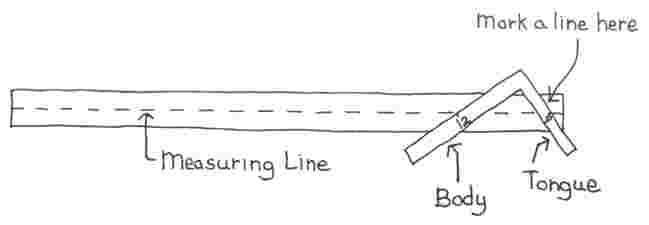
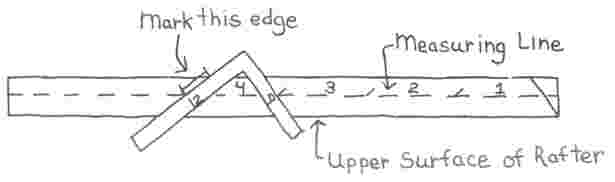
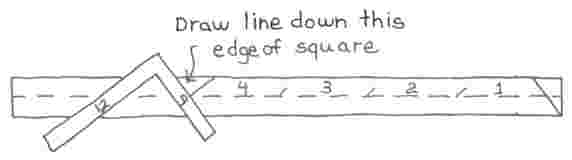
Lay your square on the lumber so the tongue intersects the lower right-hand corner of your rafter material and the body of the square is to the left. Using the scale on the outer edge of the square, place the 9 of the tongue on the measuring line so that as it extends down, it also intersects the upper surface of the rafter, which will be the edge closest to you. Then, position the square so that the 12 on the body meets the measuring line also. When all of these points on your square intersect the measuring line, draw a line down the outer edge of the tongue across your material, as shown in Drawing #16. This line is the TOP CUT for your rafter.
On a log, the curved surface will prevent you from using the edge of the square directly, but with a little care reasonable accuracy can be achieved. Don't try rolling the square around the log as you draw the line. Hold the square parallel with the ground and project the line onto the surface of the log.
Drawing #16
STEPPING OFF THE RUN
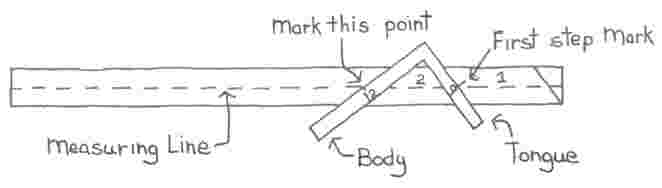
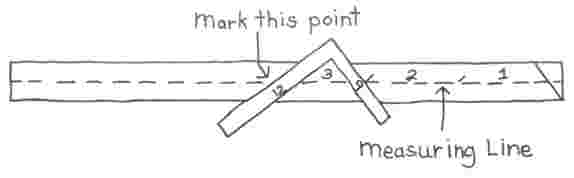
With the square in the same position, as it was for marking the top cut, you can then mark the first step of RUN in the stepping off procedure. Make a mark where the 12 on the body intersects the measuring line. Then write the number 1 on the material in the space between the body and the tongue of the square as shown in Drawing #17.

Drawing #17
Now slide the square to the left until the 9 on the tongue meets the point marked in Drawing #17. Again line up your square so the 12 on the body and the 9 on the tongue intersect the measuring line. Mark a line where the outer edge of the body meets the measuring line and write the number 2 on the lumber between the body and the tongue as shown in Drawing #18. You have now stepped off two feet of the total horizontal RUN of your rafter.
Drawing #18
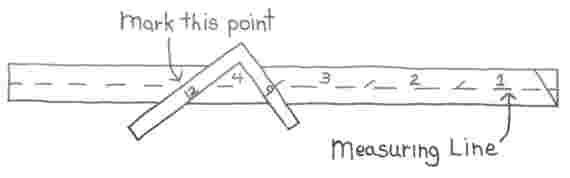
Move the square to the left again and place the 9 of the tongue on the mark made in the second step. Place the 12 of the body on the measuring line once more and mark the point of intersection as shown in Drawing #19. Write the number of the step as you did before.
Drawing #19
The fourth step is made in the same manner as the first three. This step is shown in Drawing #20.
Drawing #20
Each step made with the square is equal to one foot of the total RUN. For a rafter with four foot of RUN, as we have in this example, there will be four steps from the TOP CUT to the SEAT CUT. A rafter with a ten foot RUN would have ten steps between the TOP CUT and the SEAT CUT.
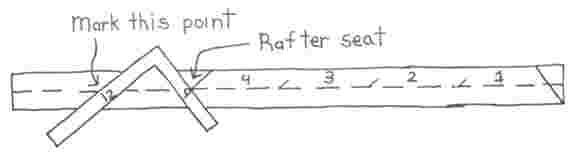
MARKING OFF THE SEAT OF THE RAFTER
You are now ready to mark the horizontal cut of the rafter seat. With the square in the same position as it was for the last step, draw a line from the measuring line to the opposite edge of the rafter material, along the BODY of the square as shown in Drawing #21.
Drawing #21
Next mark the vertical cut of the rafter seat. Move the square as if you were going to step off another foot of RUN. Place the 9 of the tongue on the point where the horizontal cut meets the measuring line, (measuring line at the mark of the fourth step). Also align the 12 of the body. Now, draw a line down the outside edge of the tongue across the width of the rafter material, as shown in Drawing #22.
Drawing #22
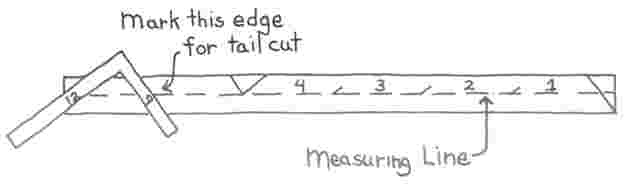
TAIL CUT
To mark the tail cut of the rafter, we refer back to the point where the rafter seat meets the measuring line. Once again we will step off as we did to determine rafter length. For each step we make there will one foot of overhang on the rafter. If we choose one step, the rafter will extend one foot away from the wall as measured perpendicular from it - two steps and the overhang will be two feet.
In this example there will only be one foot overhang. Step off as you have done before and mark the point where the 12 of the body meets the measure line, as shown in Drawing #23.
Drawing #23
Move the square to the left until the 9 of the tongue meets the mark you just made, align the square so the 12 of the body and 9 of the tongue meet the measuring line and draw a line all the way across the rafter material, down the edge of the tongue as shown in Drawing #24. This will give you your tail cut.
Drawing #24
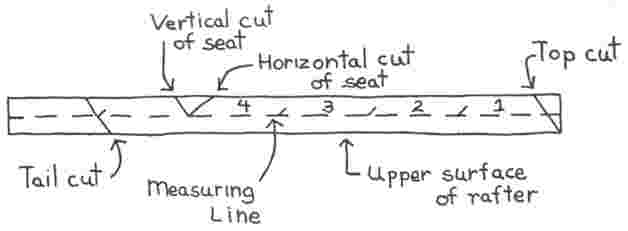
When you have completed all of these steps your rafter material should look like Drawing #25, and you have completed the stepping off procedure.
Drawing #25

